visit website photoshopqu.com
This tutorial aims to guide you from sketchbook to screen; a "Fat Cat" doodled with biro translated into a neat vector caricature. Intermediate knowledge of Adobe Illustrator is advised. Let's take a look at how to create a cheeky cat illustration - from initial concept through to vector goodness.
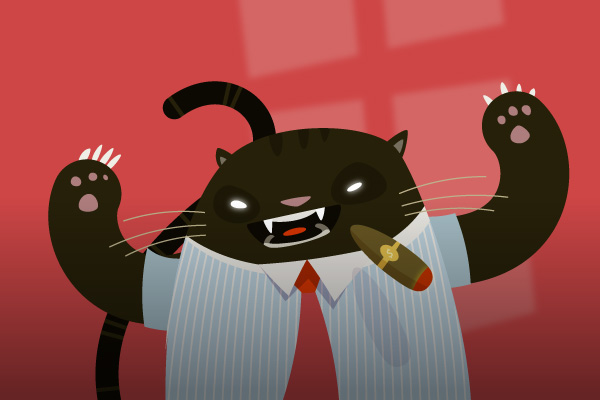
Final Image Preview
Below is the final design we will be working towards.
Preamble
Talk to any Illustrator and they'll preach the significance of sketching. The media you use are irrelevant, you could be doodling on your sitting room curtains with tomato ketchup, it doesn't matter. The important thing is that by sketching you can visualize and develop your ideas quickly. Here is a helpful article on Sketching in the Design Process.
Your drawing ability is of greater relevance, though the nature of sketching means that through practice and refinement you'll only improve. This applies to abilities across the scale. The first step is therefore up to you. Go and sketch. Throw your ideas down onto paper (or whatever), reject them, refine them or embrace them. Once you're satisfied, you can think about transferring them to your screen.
Step 1: The Sketch
For the purpose of this tut I've drawn a Fat Cat caricature. Political statement? Not really, but the term seems to be on everyone's lips worldwide at the moment. It was just in my head.
You can see by the number of lines on the sketch how much moulding he needed. This pose was also by no means the first attempt.

Step 2: Scan It and Open the Sketch
For this step you'll need a scanner, or at least some means of digitizing your sketch (digital camera, camera on your cell phone). In any case, your sketch needs to be transferred onto your computer in a high enough resolution to allow you to work with it. My sketch is 1500px wide and 1500px high which is fine.
Open your sketch file (preferably jpg, gif, png etc.) in Illustrator by either opening it directly or opening a new document and going to File > Place. Give the layer it's on an appropriate name and lock it. I've also hidden the artboard (View > Hide Artboard) to remove unwanted clutter from my screen.

Step 3: Start Drawing
The process of transforming the image into vectors is straightforward. It requires a bit of skill with the Pen Tool, but most of the decision making regarding your caricature is already done of course.
Make a new layer on which to begin your drawing and give it an appropriate name ("Objects Cat" in my case). Select the Pen Tool and begin by roughly tracing the main body form. Try to use as few anchor points as possible for smoothness, but you're not aiming for a flawless circle.
As you can see by the image below, I've drawn a closed path to begin the cat's body. Well, actually you almost can't see it. We need to improve the way we're working with the document otherwise we're going to give ourselves a headache.

Step 4: Making your Paths More Visible
Double click on your "Sketch" layer in the Layer Palette to open up the Layer Options dialogue. Check the Dim Images To Checkbox and enter a value of 30%. Click OK. This will (perhaps obviously, but these areSpoonfed vector tuts) dim all images on the "Sketch" layer to 30%, making drawing over the top easier.

Now change your path's stroke color to something clear; Magenta for example (#FF00FF). Much better!

Step 5: Continue Drawing
Use the Pen tool to draw the essential shapes which build up your caricature. The ears as shown below can stay as they are; they can be placed behind the main body form and, when colored, will stick out. The stripes on top of the head need to be trimmed to be within the body form, so use the Pathfinder tools to do this. Rype's tut on how to Create a Super Happy Octopus Character is a good resource for getting to grips with the Pathfinder tools in Illustrator.

Step 6: Cat's Arm (or Should that be Leg?)
Take advantage of some of Illustrator's methods to build the shapes you need, instead of drawing every outline with the Pen Tool. Draw a single path down the centre of the left arm. Now alter the stroke properties using the Stroke Palette; give it rounded ends and make it wide enough to fill the whole arm area.

Step 7: Cat's Arm Continued
Now go to Object > Path > Outline Stroke to change your path into an object. Give it the same stroke color and width as the rest of your drawing, then use the Pen tool to draw the claws and paws.

Step 8: Second Arm
Copy and Paste (Command + C, Command + V) the cat's arm and flip it on a vertical axis to go on the opposite side of the body (Object > Transform > Reflect). Don't duplicate the claws and paws you've already created, draw them again to give the image that little extra personality. Rotate and position the elements for the second arm as necessary.

Step 9: Hide and Seek
As your image starts to increase in complexity and your artboard splashed with more and more paths, you may find it useful to clear things up every now and then. By selecting everything you've drawn up to now (Command + A) and then Hiding it all (Command + 3) or Object > Hide > Selection, you'll make life easier on yourself. No more accidental selection of paths, or visual confusion.
Do this as you go along at various stages. When you're ready (or you've forgotten what's been drawn) you can reveal them again. They haven't been deleted!

Step 10: Face It
Zoom in and use the Pen Tool (as usual) to create the basic shapes, which build up the Fat Cat's face. You don't need to adhere 100% to the lines of your sketch, it's your drawing and you may still alter it if you wish! Next, we'll look at coloring and pathfinding the mouth to clarify what's going on there.

Step 11: Coloring the Mouth
Use shades as illustrated here in the Swatches Palette to color the objects forming the mouth. Give the main two fangs a pure 100% white so they really jump out. Also, group all the mouth elements together (Command + G).

Step 12: Finishing the Mouth
Use the Direct Selection Tool and click on the main mouth object. Copy it (Command + C) and then click on the artboard to deselect the object. Click Command + F to paste the object in place and above the mouth group.
Now select the mouth group and the recently pasted mouth object. Go to Object > Clipping Mask > Make (Command + 7) and your Fat Cat's mouth will be neatened up! At this point, you can still use the Direct Selection Tool to select teeth or other objects for repositioning.

Step 13: Keep Going!
Draw the remaining elements of the sketch; shirt collar, tie, window reflection, etc. The stripes on the shirt are made of repeated vertical stripes, aligned with equal horizontal spacing and then bulged with the Warp tool (Effect > Warp > Bulge). Paths are then converted to outlines (Object > Path > Outline Stroke) and shaped to the body using the Pathfinder Tool.

Step 14: The Tail
To form the shape of the tail, repeat the steps involved with drawing the arms; create a path (this time also making a copy), increase the stroke weight, round the ends and lastly, outline the stroke.
Paste the copied path in place (Command + F). This is going to give the stripes on our tail some direction.

Step 15: Striping the Tail
OK, a few mini-steps required here to give our tail some stripes. We're going to make a custom brush. First you'll need to make some small, horizontal paths spaced out across the artboard as in the image below. Give them as heavy a stroke weight as you want your stripes to have.

Now you'll need to randomly distribute them. With the strokes selected go to Object > Transform > Transform Each (Alt + Shift + Command + D). Fill out the options within the Transform Each dialogue as demonstrated below to distribute each stroke randomly up to 70px horizontally. Click OK.

Next drag your collection of randomly distributed paths into the Brushes Palette (Window > Brushes) and choose to make a New Art Brush. In the Art Brush Options dialogue give your brush a name and make sure it will run along the path, not across it. Click OK.

Select the central tail path and click on the new brush from within the Brushes Palette. An attractive stripy tail! To finish it go to Object > Expand Appearance and then remove the original path. Then go to Object > Outline Stroke to turn your stripes into closed paths. Finally, use the Pathfinder Tool to neaten up the stripes to within the boundaries of the tail.

Step 16: Adding Color
Having completed all the line work, it's time to make everything visible (Object > Show All) and give it some color. I've included the swatch palette in the screenshot below so you can follow the same scheme if you wish. If you build your own palette try to keep it simple and limited.
The shadow object under the collar is colored with the purple at the bottom of the swatch list (you should should try to avoid using 100% Black whenever possible, just dark shades). I've given it a Multiply Transparency of 30%.
As you can see, I've placed a background rectangle and the window object on a separate layer to keep them underneath the cat.

Step 17: Window
Give your scene a little more atmosphere by blurring the window object therefore pushing it visually into the background. Select it and go to Effect > Blur > Gaussian Blur... Give it a Radius of something like 5px and click OK. Now give it a normal transparency of 20% to finish it off.

Step 18: Blurred Vision
Let's also make the eyes that little more sinister. Copy them and then with the originals still selected go to Effect > Apply Gaussian Blur. Having just applied this effect to the window you will now automatically apply exactly the same effect with the same parameters to your selected objects. Your original eyes now have a Gaussian Blur with a radius of 5px. Click Command + F to paste the copied eyes over the top for clarity.

Step 19: Something's Missing...
Of course, you don't have to remain 100% true to your original sketch, I've been repositioning and resizing things all the way along this process. It's now come to my attention that something extra is needed, something Fat-Cattish. I'm going to add a cigar.
Using the following objects I built a cigar, coloring it afterwards sympathetically to the image. The shadow is once again a dark purple, but given an Opacity of just 10%. The glowing end of the cigar is doing just that: select it and go to Effect > Stylize > Outer Glow. In this case, the glow has a Screen Mode, a color of #CCA500, and spreads 1.75mm.


Conclusion
A couple of whiskers and there you have it! Creating an image such as this may or may not come naturally to you, practice is of course the key. The process of turning your sketches into digital art however, should now hopefully be a little easier.