visit website photoshopqu.com

In this tutorial, we'll design an extreme wallpaper in a grunge style. We'll be using layer masks, custom brushes, and the cloning tool to create this particular effect. You'll learn some interesting techniques that you can apply in your own grunge style designs.
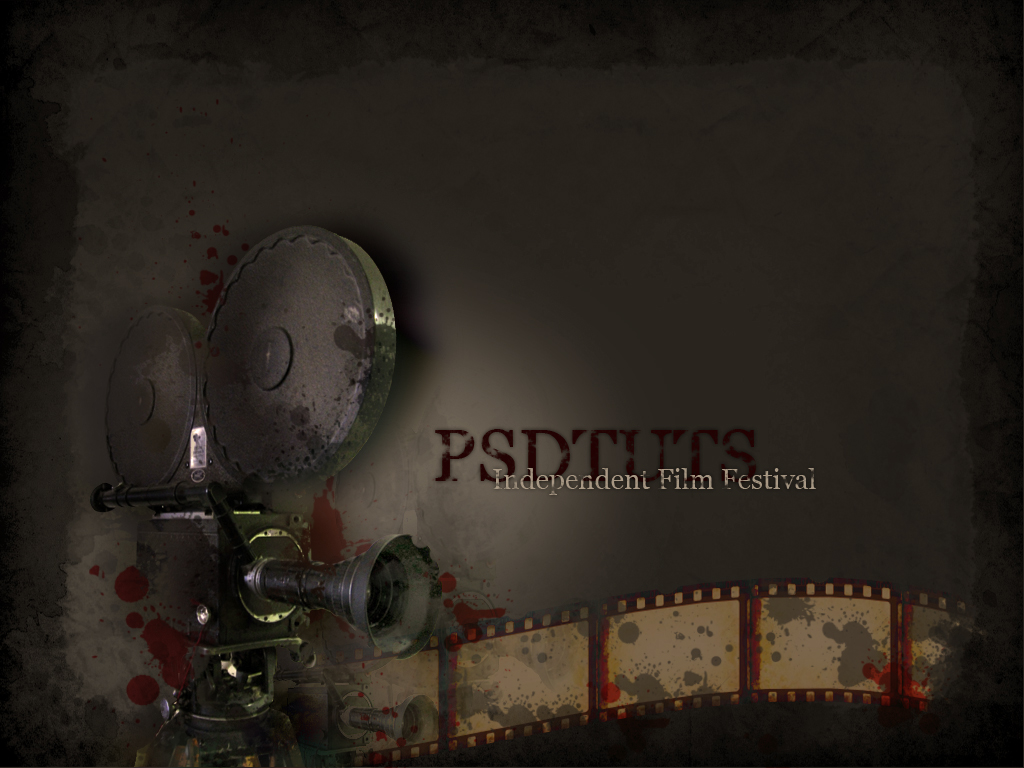
Final Image Preview
Before we get started, let's take a look at the image we'll be creating. Click the screenshot below to view the full-size image. As always, the layered Photoshop file is available via our Psdtuts+ Plus membership.
Step 1
In this tutorial, we'll create an extreme grunge wallpaper with some pictures and only one Custom brush set. You will find these techniques useful when designing posters, covers, ads, web interfaces, and much more. Before starting you must download the "Splatter brushes set" by clicking here.
Let's get started by creating a new document 1024x768px RGB 72pixels/inch. Then create a new Fill layer color (#121212). Paste this image into a new layer at the bottom left corner of the document. Then name this layer "Camera."

Step 2
With the Lasso tool or Magic Wand tool select the white background of the camera and delete it.

Step 3
Create a new Layer named "Gradient" and select the Radial gradient tool to create a Gray to Black gradient(#595959 - #000000).

Step 4
Duplicate the "Camera" layer. Then put it above the "Gradient" layer. Select Filter > Blur > Gaussian Blur. Then set the Radius to 15 pixels.

Step 5
Duplicate the "Camera" layer above the first copy. Then press CMD+F to apply the last blur effect. Also, set the Blending mode to Difference. Then set the Opacity at 50%.

Step 6
Adjust the Hue / Saturation of the "Camera copy 2" layer using the values below.

Step 7
Use the Dodge and Burn tools to lighten and darken the camera, use the values shown below.

Step 8
Select the "Camera" layer. Then add a layer mask by clicking Layer > Layer Mask > Reveal All.

Step 9
Now paint black areas into the white layer mask using the Brush Tool. Use the "Splatter Brushes Set" downloaded at the beginning of this tutorial. You can use these nice shapes to add a grunge style to the Camera. The trick is set the brush Opacity and Flow below 100%. This way you will keep the shape of the camera. I set the Opacity and Flow at 50% and 80%. I used two different Splatter brushes. Click the layer mask to start painting.

Step 10
Create a new layer named "Red Splatters" below the "Camera" layer. Then use three different brushes to draw three or more dark red (#5F0000) splatters. Then set the layer's Blending mode to Pin Light and theOpacity at 80%.

Step 11
This is a quick technique to duplicate an object by using the Clone tool. You will use the same technique to create the 35mm film forward. Create a new layer named "Camera copies." Then select the Clone tool and ALT+Click to choose the clone source. Use a splatter brush. Set the brush Opacity and Flow to 30%.
Next select Window > Clone source. Then change the Width and Height to 80%. Check Show Overlay, and set Opacity to 25%. As you can see, there's a transparent preview of the camera. Select the "Camera Copies" layer and then start cloning the camera.
Clone another camera using the same brush and cloning source, but this time change the width and height to 50%. Finally, change the "Camera copies" blending mode to Multiply.

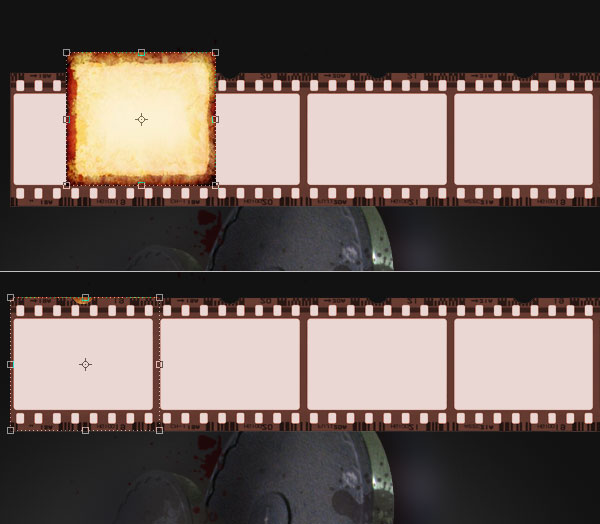
Step 12
Now it's time to add the 35mm film. First, download this image. Then select one of the filmstrips and paste it into a new layer named "Film." Then use the Magic Wand tool to delete all the white of the borders (don't worry about the frames and the little squares).

Step 13
As you can see, our film is too short; it needs to be longer. Once again, we'll use the Clone Tool. By now you must be an expert at using the Preview Cloning Source feature. This time it will be useful.
Next we (ALT + Click) the top left corner of the film. Then select a hard 100px brush. Change both Opacity and Flow to 100%. Then in the Cloning Source palette set the width and height to 100%. Finally, Start cloning the image.

Step 14
Adjust the Hue/Saturation of the layer, as shown below.

Step 15
Find a grunge paper image. Open it and paste it into a new layer. Then change its size to equal the size of a film frame. Then put the new layer below the "Film" layer. Name this new layer "FilmFrames".
Step 16
Change the "Film" layer's Blending mode to Multiply. Then using the clone tool and the same 100px brush, clone the old paper below the "Film" layer. Then CMD+Click the "Film" layer, and use CMD+I to invert the selection. Then delete all the extra texture of "FilmFrames."

Step 17
Merge both the "Film" and "FilmFrames" layers. Then name the resultant layer to just "Film". Place it at the middle. Then Warp the Film using Flag Warp. Put the "Film" layer below the "Camera Copy" layer (above the "Gradient" layer). Then set the Blending Mode to Difference.

Step 18
Put the "Film" layer some pixels up from the bottom. Then go to Layer mask > Reveal all. Use a Black to White Gradient. Be sure to hide the left side of the film. Also, use a Splatter Brush to add some splatters to the layer mask, and apply a darker brush on the film's right side. Finally, set the "Film" layer's Opacity to 50%.

Step 19
Select the "Red Splatters" layer and add some dark red splatters on the film.

Step 20
Now we'll use the paper image again. Paste it into a new layer, and name it "Paper." Then change theSaturation to -100, and place it below the "Gradient" Layer.

Step 21
Now set the "Gradient" layer's Blending Mode to Multiply and Opacity to 90%. Also, change the background's Opacity to 20%.

Step 22
Create a new layer above the "Gradient" layer. Name it "Light". Using the Elliptical Marquee Tool, draw an oval. Then select CMD+ALT+D to set the Feather radius to 50px. Finally, fill the oval using the Paint buckettool with the color (#6a6a6a).

Step 23
Create two text layers. I used the Georgia font and these colors: dark red (#250101) and light grey (#9c9c9c). Then select one of the text layers, and go to Layer Mask > Reveal All. Use a Black splatter brush to paint some areas of the layer mask to hide a bit of the text shape. Do this in both text layers. Finally, add a Drop shadow effect to both layers using the values below.

Step 24
Finally, add a new Adjustment Layer called "Photo Filter." This time I used a yellow Warming Filter (81)with a Density of 50%.

Conclusion
Now you have an extreme grunge design. Have fun making your own!
