visit website photoshopqu.com
In this tutorial, we'll explain how to create a 3D chess scene with the help of the 3D Revolve Tool and gradient masks. This is a great introduction to the 3D Tool in Illustrator, and shows you how to pose your creations within an illustrative checkered environment.
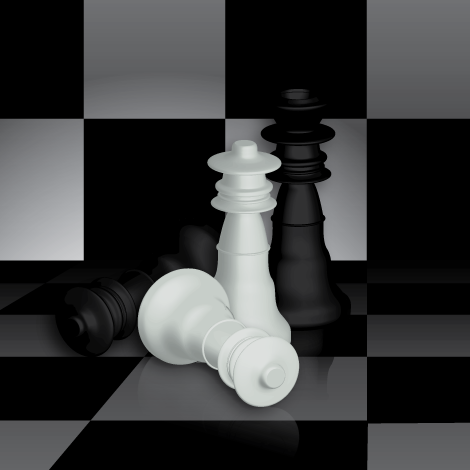
Final Image Preview
Below is the final design we will be working towards. Want access to the full Vector Source files and downloadable copies of every tutorial, including this one? Join VECTORTUTS PLUS for just $19/month.
Step 1
Start drawing a shape like you see in the image below. The importance it to imagine how the outline of a chess piece looks. Of course there are many types and shapes, so pick one you like, or just make one up.

Step 2
We need to set up our color for the chess piece and I chose white. But in order to have some gradients and not just a striking white, I chose a slightly dirty grey. Notice the stroke is set to 1pt.

Step 3
With the shape selected, go to Effect > 3D > Revolve. Apply the settings you see in the image below. Also, add another highlight by clicking the New Light button. Then click OK.

Step 4
Add a Drop Shadow next and make sure that you have opposite values in the X Offset and Y Offset fields. Choose Multiply as the Mode.

Step 5
Make a copy of the 3D shape and place it downwards. Then open the 3D Revolve effect via the Appearance Palette and change the settings so the chess piece looks like it was tipped over. Add several new highlights.

Step 6
Next we add a Drop Shadow.

Step 7
Create a rectangle as a backdrop and fill it with black, then place it behind all the shapes.

Step 8
Now make another copy of the first chess piece, change the Stroke color to black. Now, open the 3D Revolve effect via the Appearance Palette and change the placement once again. Add several highlights to bring out the second tipped over piece.

Step 9
Now add another Drop Shadow.

Step 10
Now on to the chess pattern. Create a square with the Rectangle Tool (M). You can do this by holding down the Shift + Alt key.

Step 11
With the shape selected, go to Object > Path > Split into Grid and apply an even setting of rows and columns. Make sure that you set the gutter width to 0.

Step 12
This is our chess grid.

Step 13
Then with the grid shape selected, go to Object > Live Paint > Make (Alt + Ctrl + X)

Step 14
Then select the Live Paint Bucket (K) and set the Stroke Color to none and the Fill Color to black.

Step 15
With the Live Paint Bucket (K) move over the squares and you can see that it highlights the square.

Step 16
Start filling every second square in our grid with black by simply clicking on it with the Live Paint Bucket Tool (K).

Step 17
Repeat the Live Paint Bucket Tool (K) with the other squares and fill them with white. Make a duplicate and keep it handy for later.

Step 18
Now select the chess pattern shape and place it behind the chess pieces but on top of the black backdrop. Put it slightly higher, as shown.

Step 19
Create a large rectangle, then fill it with a black to white linear gradient, and set the Angle to -90 degrees.

Step 20
Select both, the rectangle and the chess pattern shape and apply an Opacity Mask. This will darken the scene.

Step 21
Use a copy of the chess patterns (Step 17) and place it below the others. Then scale it proportionally by selecting the Scale Tool (E), then clicking a corner and pressing Ctrl + Shift + Alt and drag in the appropriate direction. You might have to over scale it a bit larger to get the correct perspective.

Step 22
Apply another Opacity Mask like we did in Step 20.

Step 23
We see now our drop shadows of the chess pieces. You might have to adjust the alignment of the floor and wall shapes so they'll meet up properly.

Step 24
I added a reflection to the chess piece in front. You can do that by making a copy of the chess piece, expand the appearance and apply an Opacity Mask. Make sure you place it underneath the visible chess piece.

Step 25
Check Mate! I added another chess figure slightly different from the first, a bit bigger and with a different top shape. Then I added more reflections, just like I did in Step 24. I also duplicated the wall and set the gradient for the Opacity Mask to radial, just behind the chess pieces. At the end, I added a clipping mask with a square. That's it folks! I hope you enjoyed this small 3D experiment.
Conclusion
I removed the backdrop and the wall, just to see that there are many more options to create the scene. Also, you can give it color and choose a brown or dark red for the chess pieces. Have fun!
