Showing posts with label Beginner. Show all posts

How to Make a Delicious Vector Orange in 9 Decisive Steps

Thank's and support to photoshopqu.com
visit website photoshopqu.com
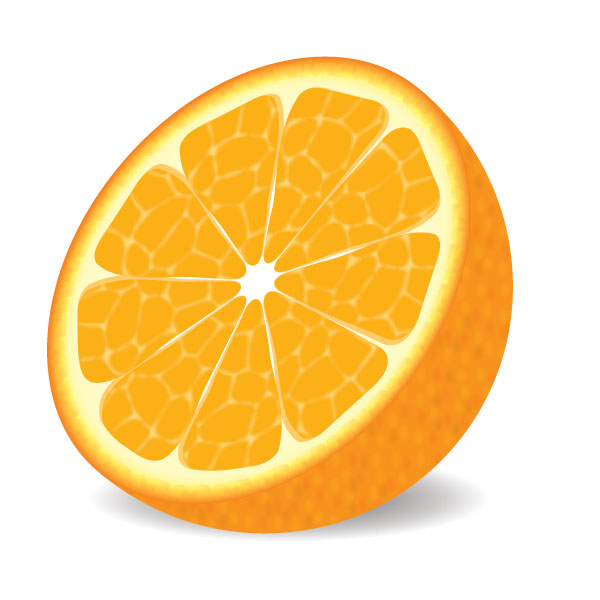
Learn how to create a semi-realistic vector orange with simple shapes, tools, and multiple effects. This tutorial is possible for a beginner to complete, though is aimed at an intermediate Illustrator user. Let's get started.
The first thing that we have to do is to create a triangle that is 2 inches wide by 3 inches high, then fill it with an orange color (R=252, G=175, B=23). Next, we apply an effect to make the corners round. To do this go to Effect > Stylize > Round Corners, and set the value to 0.5 in. Now go to menu Object > Expand Appearance and then Ungroup (Command + Shift + G) the result.
In this step we create the texture of the orange. Copy (Command + C) the object already created and paste it to the front (Command + F). Change the color of the fill to white. With this last object selected, go to Effect > Texture > Stained Glass, and set values to: Cell Size of 45, Border Thickness of 10, and Light Intensity of 0.
Expand the same object (Object > Expand Appearance). Next, go to Object > Live Trace > Tracing Options, set the values that are shown below, and Expand it (Object > Expand). Also, be sure to check Object and check Fill.
To this last object with the Stained Glass effect, fill it with a white color, then Ungroup (Command + Shift + G) it three times. With this last object selected, go to Object > Path > Simplify, and set the Opacity to 60%. Apply a Gaussian Blur (Effect > Blur > Gaussian Blur) with a Blur Radius set to 6.0 pixels. Finally, group these two objects.
Now create the other pieces of the orange. Rotate the object by Alt-clicking to the position that we want to be the center of the orange, then in the window that appears set the Angle to 40º, and click in Copy. To create the other pieces we just repeat tha last action (Command + D) seven times
Let's make the orange look not so straight and give it a more natural look. Select the Pucker tool, then use the values shown below to retouch the whole object and to give the natural aspect that we desire. Next, select everything (Command + A) and Ungroup (Command + Shift + G).
Select one of the orange colored objects, then go to Select > Same > Fill Color. Copy (Command +C) the recent selection, paste it in back (Command + B), and group (Command + G) it. Next, we rotate a little so that it looks like the image below. Lastly set the Opacity to 40%. Then Select All (Command +A) and Group (Command + G) it.
In this step we'll form the edge of the orange. Create an ellipse (L) with a width and a height of 6.5 inches (the color of the line is not important). Next, create a group of ellipses as shown below, the size we'll be proportional to the orange. Group (Command + G) these ellipses, move them to the Brushes Panel, and check New Pattern Brush. In the Pattern Brush options leave it as is.
If you want to give a name to our Pattern Brush that's great, I named it "ORANGE." After creating the pattern brush, erase the group of ellipses, then apply this pattern brush to the 6.5 inches ellipse that we created some moments ago. Lastly, set tha Opacity to 15%.
Continuing with the edge of the orange, create another ellipse (L) with a width and a height of 7 inches, then Send it to the back (Object > Arrange > Send to Back). With the object selected, go to the Gradient Panel and set the values as shown in the image below.
Now let's create the exterior of the orange. First, select everything (Command + A) and Group (Command + G) it. Change only the width of our orange to 5.5 inches. After that we create an ellipse (L) with a width of 5.5 inches and a height of 7 inches, then fill it with a orange color (R= 245, G=130, B=32).
Draw a vertical line that intersects in the middle of the ellipse that we just created, then go to the Pathfinder Panel, click Divide, and then Ungroup (Command + Shift + G) the result. Erase one of the halves of the ellipse and to the other half change the width to 3.5 inches.
Step 8
Next we proceed to create the texture for the exterior of our orange. Create a rectangle with a width and a height of 1 inch, no Fill, and no Stroke. Copy (Command + C) this rectangle and we paste it all to the front (Command + F). Then Fill this rectangle with an orange color (R=245, G=130, B=32).
Create various ellipses inside the rectangle with the colors that are shown below. Select all the ellipses inside the rectangle and apply a Gaussian Blur (Effect > Blur > Gaussian Blur) with a Radius of 7.0 pixels.
Ungroup the two rectangles, the ellipses, and move the object to the panel of swatches. Apply the swatch that we just created to the half ellipse. The rectangle that has no fill and no stroke serves to limit the area of the swatch.
With the texture of the exterior of the orange ready, align tha half-ellipse in the middle of the orange so that it looks natural. Send tha half-ellipse to the back (Object > Arrange > Send to Back). Finally, select everything (Command + A) and rotate it a little.
At the very end, we create an ellipse with a width and height of 5.5 inches, then fill it with a gradient (center, R=100, G=100, B=100; edge R=255, G=255, B=255). Change the height to 1.2 inches and send it to the back of the orange. It's done! The final image is shown at the end of the series of images below.
Subscribe to the VECTORTUTS RSS Feed to stay up to date with the latest vector tutorials and articles.

Design a Vector Audio Speaker Icon In Illustrator

Thank's and support to photoshopqu.com
visit website photoshopqu.com

In this intermediate tutorial, I'll show you how to create a vector speaker icon. When you break down the elements you'll find it fairly easy. We'll be using some ellipses with gradients, the Grid Tool, and the Mesh Tool to create this icon design.
Create a new document that is 8.5 inches wide by 11 inches tall. Then use the Ellipse Tool (L) and create a 6 inch by 6 inch ellipse.
Step 1
With the ellipse selected, create a Linear Gradient from the Gradient Panel. Add another swatch to the Gradient Slider by clicking just below the slider. Change the first swatch to a 57% black, the second swatch to a 12% black, and the third swatch to a 57% black.
Step 2
With the Gradient Tool (G), adjust the gradient by clicking and holding Shift, and drag from the top-right of the circle to the bottom-left. Now, the gradient should look like it is at a 45 degree angle.
Step 3
With the ellipse selected, go to Object > Path > Offset Path to bring up the offset dialog. Change the Offset to -.125 inches.
Step 4
Change the first swatch on the offset ellipse to a 50% black, the second swatch to a 4% black, and the last swatch to a 50% black.
Step 5
With the smallest ellipse selected, Offset the path again. This time set the Offset to -.3 inches and change the fill to a 60% black.
Step 6
With the smallest ellipse selected, Offset the path yet again. This time change the Offset to -.125 inches.
Step 7
With the new ellipse, create a Radial Gradient from the Gradient Panel and change the first swatch to white and the second swatch to a 100% black.
Step 8
With the radial gradient ellipse selected, Offset the path at -.3 inches and change the fill color to a 50% black.
Step 9
Offset the latest ellipse again, but this time change the Offset to -.05 inches and change the fill color to a 90 % black.
Step 10
Again, Offset the latest ellipse, but change the Offset to -.125.
Step 11
Create a three swatch Linear Gradient like the first few ellipses. Change the first swatch to a 82% black, the second swatch to a 34% black, and the last swatch to a 82% black. Like the first couple of Linear Gradients, adjust the gradient to a 45 degree angle.
Step 12
With the Rectangular Grid Tool (located under the Line Segment Tool in the Tools Panel) click on the artboard to bring up the Rectangular Grid Tool Options dialog. In the dialog change the Width and Height to 5 inches and change the Horizontal and Vertical dividers to 80.
Step 13
Make sure the grid has a 1 point black stroke with no fill. Then expand the strokes of the grid by going to Object > Path > Outline Stroke. If you don't outline the strokes of the grid, you'll get some unexpected results when you proceed to the next step.
Step 14
With your grid selected, go to Effects > Warp > Twist to bring up the Warp Option dialog. Change the Bend for the Twist effect to 50. Next, expand the appearance of the effect by going to Object > Expand.
Step 15
Place the grid so it is centered over the ellipses. Copy (Command + C) the second to last ellipse (the 90% black filled one) and Paste it in Front (Command + F). Select the copied ellipse and the grid, and press the Intersect Shape Areas in the Pathfinder Panel. Finish it up by pressing the Expand button in panel.
Step 16
Select the ellipse right below the grid (it might be easier to select the ellipse by locking (Command + 2) the grid object. Then Offset the path -1.25 inches. Bring the ellipse to the front and change the gradient so it only has two swatches. Change the first swatch to a 50% black and the second swatch to a 4 % black. Adjust the gradient so the darker color is at the top of the gradient.
Step 17
With the ellipse still selected, Offset the path -.125 inches and change its fill to a 30% black.
Step 18
Withe the Mesh Tool (U), click halfway between the top and center of the ellipse in the middle, which creates a Mesh Point. With the Mesh Point still selected, change the color in the Color Panel to white. Next, use the Mesh Tool again to make a Mesh Point by clicking on the vertical line from the first Mesh Point towards the bottom of the ellipse. Change this Mesh Point to a 40% black.
Step 19
Select the ellipse under the mesh ellipse and Copy (Command + C) and Paste it in Front (Command + F). With the Selection Tool (V), stretch the copied ellipse down from the bottom-middle anchor point. Change the color to a 70% black and send the object behind the grid.
Step 20
The next couple of steps deal with the screws on the edge of the speaker. Create an ellipse that is .16 inches by .16 inches. Then create a Linear Gradient with the same swatches as the ellipse in the middle of the speaker (not the mesh ellipse). Adjust the gradient so the darker color is at the top of the ellipse.
Step 21
Offset the ellipse by .03 inches, and adjust the gradient so the lighter color is at the top of the ellipse.
Step 22
Copy (Command + C) and Paste (Command + V) these two ellipse so you have a total of four screws. Place the screws around the rim of the speaker.
Step 23
Draw a 4 inch by 4 inch ellipse and create a Radial Blend. Change the gradient so the first swatch is black and the second is white.
Step 24
Squish the Radial Gradient ellipse with the Direct Select Tool (V). Place the ellipse behind all the other artwork. Also, line up the center of the ellipse with the bottom of the speaker.
Step 25Step 26
That's pretty much it! If you want to add a background color, make sure the drop shadow shape is set to multiply in in the Transparency Panel. For my background, I created a rectangle the size of my document, and used a Radial Gradient with a 75% black as my first swatch and a 100% black as my second swatch.
Step 26
Below is the final image completed!

Create a Cool Water Ripple Effect in Illustrator

Thank's and support to photoshopqu.com
visit website photoshopqu.com


We'll be using Adobe Illustrator to create this tutorial. A water ripple effect can easily be achieved using a radial gradient. Besides this, I will be showing you how to create water droplets using the Gradient Mesh tool.
Let's get started by drawing a circle using the Ellipse Tool (L). Hold Shift as you drag on the canvas to make it a perfect circle. Next, change it to a Gradient Fill. By default it is a white to black gradient.


Open up your Gradient panel (Window > Gradient). Change the Type to Radial and select the Gradient Slider (square with an arrow icon). Set it to blue using your Color panel.


Select the first Gradient Slider and set it to a dark blue. Click beside it to create a new Gradient Slider, and set it to white. Repeat this to create a new Gradient Slider beside this new point, and set it back to blue.


Let's continue repeating the steps until we have something as shown below. You will notice the darkest point is set in the middle. Don't worry too much how the ripple will look like at this stage, as we can tweak it later on.


Select the circle and you will see a bounding box appear. Drag a corner and squash it into a an oval shape.


Now we will start creating the background. Draw a new Rectangle (M). By default it will use the radial gradient we have created.


Open up your Gradient panel again. Change it to a Linear Type this time. Keep the start and end points. Delete the rest of the unnecessary points. Finally, select the start point and change it to a lighter blue.


Send the background to the back by pressing (Control + Left Bracket). Resize the background so that we have more space on the top. Select the Gradient Tool (G) and click and drag from top to bottom to change the gradient direction.


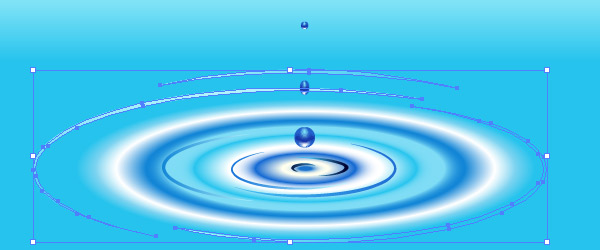
Let's draw more ripples to make it look more realistic. Draw a new oval shape using the Ellipse Tool (L). Select the Scissors Tool. Then cut it at the bottom left and top right. This will break it into two segments.


Drag the two segments into the ripple. You can resize it by dragging the bounding box. Repeat the above steps to create more ripples, as shown below. Have fun adding new ripples until you achieve a great looking ripple effect.


Let's start creating the brush for the ripple. Draw a long thin oval with the Ellipse Tool (L). Select the Pen Tool (P), hover it to right corner, and hold Alt. It will change to an arrow icon. Click the point to change it to a corner point. Do this for the left corner and bottom pont.


Click the bottom point and press the Arrow Up key to move the point until the baseline becomes straight as shown below. Open up your Brushes panel (Window > Brushes). Then drag your shape to the panel to create a New Art Brush.


Select all the ripples and choose the new art brush. The brush effect will be applied to the ripples. If the ripples appear too thick you can change the Stroke Weight to make it thinner.


Now we will need to expand it so that we can fill it with a gradient. Select all the ripples, and go Object > Flatten Transparency. Set the Raster/Vector Balance to 100 and click OK. It is grouped by default after your flattened it. Press Control + Shift + G to Ungroup it.


Select each ripple and give it a different color gradient effect. With the Gradient Tool (G), we can select and drag to change the gradient directions. We can also also use the Eyedropper Tool (I) to pick colors from our main ripple. To do this, select a Gradient Slider first, then select the Eyedropper Tool (I) and hold Shift as you click the main ripple to sample the color. With this in mind, we can quickly apply the gradients to all the ripples.


Here is the final ripple. I have set the darkest ripple in the middle and it get's lighter towards the edge.


Let's create the water droplet. Draw a blue circle using the Ellipse Tool (L). Go to Object > Create Gradient Mesh. Use the settings shown below.


With the Direct Selection Tool (A), select the second point from the bottom. Set it to white using the Color panel. Next, select the second point from the top and give it a lighter blue.


Select the three points in the middle row and set it to a darker blue. Next we will start to edit the gradient mesh. Select the point beside the white point and drag it away from the white point. Do this for the other side and the three darkest points. Our goal here is to make the white highlight more oval instead of circle.


Finally we move the water droplet above the ripple. Click and hold Alt as you drag to create a duplicate. Repeat it until you have three water droplets above the ripple.


Squash the second water droplet and resize it smaller using the Free Transform Tool (E). Also make the top water droplet the smallest. Finally, I make my final tweaking to the ripple by transforming it bigger as I felt it is too tight.


Advertisement
If you are unhappy with the color for the the water droplets, you can further adjust it. Here's how to do it. Select the three droplets and go Edit > Edit Colors > Adjust Colors. Check Preview and increase the Green to make it look turquoise.


Below is our final image of a serene water ripple effect.